English
 عربى
عربى
Content
- 1 How to Make a Pillow: The Direct Answer
- 2 Choosing Your Fill Material Before You Cut a Single Piece of Fabric
- 3 Standard Pillow Dimensions and How to Size Your Shell Correctly
- 4 Selecting the Right Fabric for Your Pillow Shell
- 5 Step-by-Step: How to Sew a Pillow Shell
- 6 How to Make a Memory Foam Pillow at Home
- 7 Adding a Zipper vs. Hand-Stitching: Which Closure is Better
- 8 How to Make a Pillow Without a Sewing Machine
- 9 Common Mistakes That Ruin a Homemade Pillow
- 10 How to Care for a Homemade Pillow
- 11 Cost Comparison: DIY vs. Buying a Ready-Made Pillow
- 12 Frequently Asked Questions
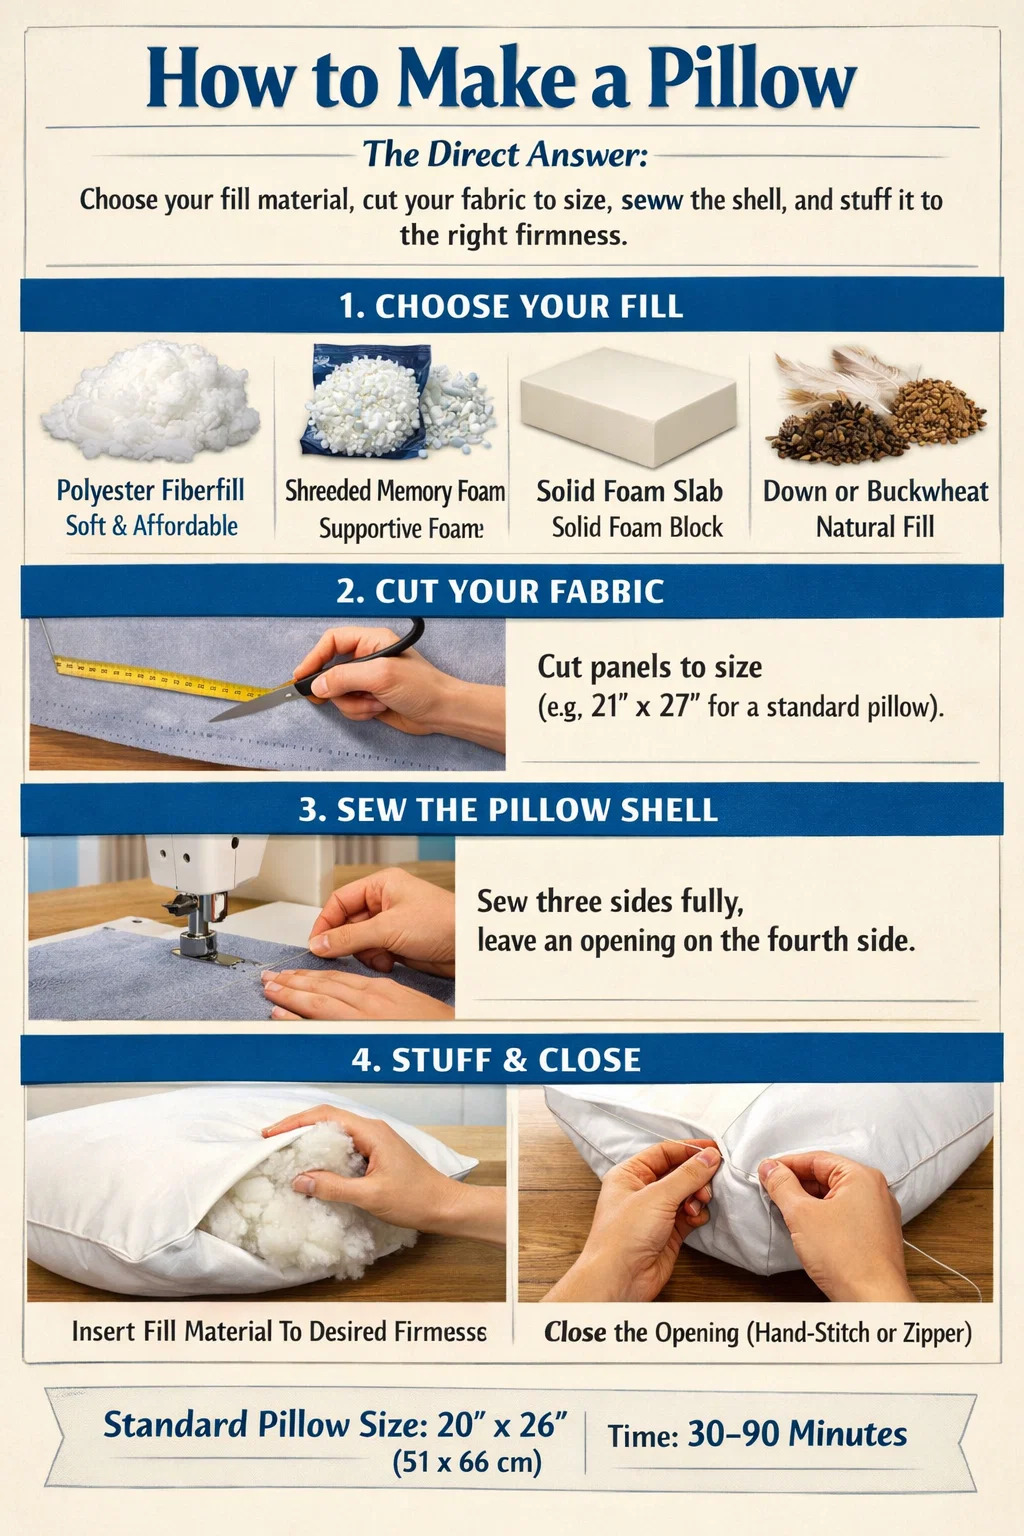
How to Make a Pillow: The Direct Answer
Making a pillow comes down to four fundamentals: choose your fill material, cut your fabric to size, sew the shell, and stuff it to the right firmness. For most people, a standard bed pillow measures 20 × 26 inches (51 × 66 cm), and the entire process—from cutting fabric to closing the final seam—takes between 30 and 90 minutes depending on your fill type. If you are working with a memory foam pillow, the process differs slightly because you are cutting or shredding foam rather than filling with loose fiber, but the structural approach remains the same.
The sections below walk through every decision point in detail: materials, dimensions, sewing methods, fill ratios, and finishing techniques. Whether you want a traditional down-style bed pillow, a DIY memory foam pillow, or a decorative throw pillow, the guidance here covers each path specifically.
Choosing Your Fill Material Before You Cut a Single Piece of Fabric
The fill material you select determines not only how the pillow feels but also how you construct the shell, how tight your seam allowances need to be, and how you will close the pillow after stuffing. Committing to a fill type first prevents costly rework.
Polyester Fiberfill
Polyester fiberfill is the most beginner-friendly fill. It is sold by weight at craft stores and online suppliers, costs roughly $3–$8 per pound, is fully washable, and produces a soft, cloud-like pillow. A standard queen-size pillow typically requires 12–16 ounces of fiberfill. The main limitation is that fiberfill compresses over time and will need refluffing or replacement after 18–24 months of nightly use.
Shredded Memory Foam
A DIY memory foam pillow built with shredded foam delivers a far more supportive sleep surface than fiberfill. You can purchase pre-shredded memory foam fill in bulk bags (typically 3–5 lb bags for $15–$35), or shred a used foam mattress topper yourself using an electric carving knife or scissors. The ideal fill weight for a standard 20 × 26 inch memory foam pillow is between 2.5 and 4 pounds, though personal preference varies significantly—side sleepers generally need more fill (firmer, loftier) while stomach sleepers need less (flatter, softer).
Shredded memory foam has a natural tendency to off-gas a faint chemical odor when first unpacked. If you are sourcing foam from a topper or old mattress, allow it to air out for 24–48 hours before stuffing the pillow shell.
Solid Memory Foam Slab
Rather than shredding foam, some makers prefer to cut a solid slab of memory foam to fit a pillow shell exactly. This approach produces a more consistent, contoured feel—similar to a commercial memory foam pillow—but requires a sharp electric knife and precise measuring. A 3-inch-thick slab cut to 20 × 26 inches works well for most adults. The foam should have a density of at least 3 lb/ft³ for adequate support and durability; anything below that density compresses too quickly and loses shape.
Down and Down Alternative
Natural goose or duck down creates an exceptionally soft, lightweight pillow but requires tightly woven downproof fabric (thread count 280 or higher) to prevent feather migration. Down alternative—typically fine polyester microfiber—mimics the feel of down at a fraction of the cost and is hypoallergenic. If you choose down or down alternative, budget extra time for the stitching because loose fill escapes through any gap wider than the diameter of a needle hole.
Buckwheat Hulls
Buckwheat hull pillows are popular in Japan and increasingly common in North America and Europe. The hulls conform to head shape without springing back, which many sleepers find grounding. They are heavy—a standard pillow holds 6–8 pounds of hulls—and make a distinct rustling noise when you move. They are, however, completely adjustable: add or remove hulls through a zipper to dial in loft precisely.
Standard Pillow Dimensions and How to Size Your Shell Correctly
Getting the shell dimensions right is critical. A shell that is too large results in a flat, shapeless pillow; one that is too small will be impossibly tight to close after stuffing. The table below lists common pillow sizes and the recommended fabric cut sizes, accounting for a standard ½-inch seam allowance on all four sides.
| Pillow Type | Finished Size | Cut Size (each panel) | Typical Fill Weight |
|---|---|---|---|
| Standard | 20 × 26 in | 21 × 27 in | 12–16 oz fiberfill / 2.5–4 lb foam |
| Queen | 20 × 30 in | 21 × 31 in | 14–18 oz fiberfill / 3–4.5 lb foam |
| King | 20 × 36 in | 21 × 37 in | 16–22 oz fiberfill / 4–6 lb foam |
| Euro (Square) | 26 × 26 in | 27 × 27 in | 18–24 oz fiberfill / 3.5–5 lb foam |
| Throw / Accent | 18 × 18 in | 19 × 19 in | 8–12 oz fiberfill |
If you are making a memory foam pillow with a solid slab insert, cut the foam 1 inch smaller than the finished pillow dimensions on each side—so for a standard 20 × 26 inch pillow, cut the foam to 18 × 24 inches. This slight undersize allows the foam to sit properly inside the shell without creating tension seams that blow out under pressure.
Selecting the Right Fabric for Your Pillow Shell
Fabric choice affects breathability, durability, ease of sewing, and how the pillow feels against skin. Bed pillows live in direct contact with your face for 6–9 hours a night, so material quality matters more here than in almost any other sewing project.
Cotton and Cotton Blends
100% cotton with a thread count of 200–400 is the standard choice for bed pillow shells. It breathes well, washes easily, and is durable enough to last years. Egyptian cotton and Pima cotton offer a noticeably softer hand feel. For a memory foam pillow shell, a tightly woven cotton—sometimes called ticking fabric—prevents small foam particles from working through the weave over time, which is the same issue you encounter with down.
Bamboo-Derived Fabric
Bamboo viscose has become a popular choice for pillow shells in recent years because of its moisture-wicking properties and naturally cooling feel. Bamboo fabric can absorb up to 40% more moisture than cotton, making it particularly useful if you sleep hot—a common complaint with memory foam pillow users since foam retains more heat than loose fill. Bamboo fabric is slightly more difficult to sew cleanly because of its drape and stretch, so use a ballpoint needle and reduce presser foot pressure.
Linen
Linen is breathable and gets softer with each wash, but it wrinkles easily and has a coarser texture that some sleepers find uncomfortable against bare skin. It works better as a pillowcase fabric or for decorative throw pillows than as a sleeping pillow shell.
Microfiber and Synthetic Fabrics
Microfiber polyester is durable, stain-resistant, and cheap—often under $3 per yard. It is less breathable than natural fibers but holds up extremely well in the wash. For children's pillows or accent pillows that will see heavy use and frequent laundering, microfiber is a practical option. Avoid it if your fill is shredded memory foam because the slippery surface makes it harder to achieve an even fill distribution.
Step-by-Step: How to Sew a Pillow Shell
The sewing process is the same whether you are making a fiberfill pillow or a shredded memory foam pillow. The only difference is how and when you insert the fill, and whether you add a zipper.
- Pre-wash your fabric. Wash and dry your fabric before cutting. Cotton in particular can shrink 3–5% after the first wash, which will distort your finished dimensions if you skip this step.
- Cut two panels. Cut two identical rectangles of fabric according to your target pillow size plus seam allowance (see the table above). Use sharp fabric scissors or a rotary cutter and cutting mat for clean, straight edges.
- Pin the panels together, right sides facing inward. Place the two fabric panels face-to-face so the "good" side of the fabric is on the inside. Pin all four edges, spacing pins about 3 inches apart.
- Sew three sides completely and most of the fourth. Sew along all four edges with a ½-inch seam allowance. On the fourth side, leave an opening of approximately 8–10 inches for turning and stuffing. Backstitch at the beginning and end of every seam.
- Clip the corners. Cut diagonally across each corner, getting close to (but not through) the stitching. This removes bulk and creates crisp, sharp corners once the pillow is turned right-side out.
- Turn the shell right-side out. Push the shell through the opening, using a chopstick or blunt pencil to push the corners fully out.
- Press the seams flat. Use a warm iron on the appropriate setting for your fabric to press the seams, including the seam allowances of the unsewn opening, which will make the final closure neater.
- Stuff the pillow. Insert your chosen fill material through the opening. For fiberfill, work in small handfuls and distribute evenly, paying attention to the corners. For a solid foam slab, fold or compress the foam slightly to get it through the opening, then allow it to expand inside. For shredded memory foam, use a wide funnel or zip bag to channel foam through the opening without creating a mess.
- Close the opening. For a permanent closure, fold the raw edges inward by ½ inch and hand-stitch with a slip stitch or ladder stitch. For a removable cover, install a zipper before assembly (see the next section) or use hook-and-loop tape at the opening.
How to Make a Memory Foam Pillow at Home
A DIY memory foam pillow requires a few additional considerations beyond standard pillow construction. The foam itself is the main variable, and getting that right makes the difference between a pillow that sleeps like a quality commercial product and one that is uncomfortable within a week.
Sourcing Memory Foam
You have three realistic options for sourcing foam for a homemade memory foam pillow:
- Buy pre-shredded memory foam fill — available from bedding and fabric suppliers online. Prices range from $15 to $40 for a 3–5 lb bag, which is enough for one to two standard pillows.
- Shred a memory foam mattress topper — a 2-inch queen topper (often found for $20–$60) yields enough foam to fill 4–6 pillows. Use an electric carving knife and cut into roughly 1-inch irregular pieces for the best conforming behavior.
- Buy a foam slab cut to size — foam suppliers like Foam Factory or FoamOrder sell cut-to-size pieces. A 3 lb/ft³ density, 3-inch-thick slab in a standard pillow size typically costs $25–$45.
The Inner Cover (Liner) for Shredded Memory Foam
One feature that separates a well-made shredded memory foam pillow from a poorly made one is the inner liner. Most quality commercial memory foam pillows include a separate inner cover—typically made of stretch knit or tightly woven cotton—that holds the shredded foam, and a removable outer cover over that. This construction prevents foam particles from clumping all to one side overnight and makes it easier to adjust fill without creating a mess.
To replicate this at home, sew a simple inner liner from an old cotton pillowcase or jersey fabric. Fill it with shredded foam, zip or stitch it closed, and then insert the liner into your finished outer shell. This two-layer construction extends the usable life of your memory foam pillow significantly because you can wash the outer cover without agitating the foam.
Installing a Zipper for Adjustability
One of the primary advantages of a DIY memory foam pillow over a budget commercial option is the ability to add or remove fill. To make this practical, install a concealed zipper along the shorter side of the pillow before sewing the shell together. A 20-inch zipper works well for a standard pillow. Many sleepers find they need to remove 10–20% of the original fill volume to achieve their preferred loft—this is especially true for stomach sleepers who tend to need a much flatter pillow than the default fill level provides.
Loft and Firmness Guidelines by Sleep Position
The table below summarizes recommended fill amounts for a DIY shredded memory foam pillow in a standard 20 × 26 inch shell, organized by sleep position and body build.
| Sleep Position | Recommended Fill | Approx. Loft (uncompressed) | Firmness Level |
|---|---|---|---|
| Side Sleeper | 3.5–4.5 lb | 4–5 inches | Medium-Firm |
| Back Sleeper | 2.5–3.5 lb | 3–4 inches | Medium |
| Stomach Sleeper | 1.5–2.5 lb | 2–3 inches | Soft |
| Combination Sleeper | 2.5–3.5 lb | 3–4 inches | Medium |
Adding a Zipper vs. Hand-Stitching: Which Closure is Better
How you close your pillow affects both convenience and longevity. There is no universally "correct" answer, but the choice has real consequences for how useful the pillow is over its life.
Hand-Stitched Closure
A hand-stitched slip stitch or ladder stitch creates an invisible closure on the finished pillow. It requires no additional hardware, is relatively quick once you get the technique down, and produces a very clean look on decorative throw pillows. The drawback: once sewn shut, you cannot add or remove fill without cutting the seam open. For a pillow you intend to wash frequently (like a child's pillow), hand-stitched closures can weaken over repeated laundering.
Zipper Closure
A zipper—particularly a concealed or invisible zipper—is the professional choice for any pillow you plan to adjust or wash regularly. For a memory foam pillow specifically, a zipper is almost essential because most people need to experiment with fill volume before finding their ideal loft, and being able to open the pillow easily makes that process practical rather than frustrating. Install the zipper before sewing the rest of the shell together: stitch one side of the zipper tape to one fabric panel, then the other side to the second panel, and proceed with the rest of the assembly.
Envelope Closure
An envelope closure—where one fabric panel is cut wider and folded over to create an overlapping back—is common on decorative throw pillow covers. It requires no zipper and allows the insert to be removed easily. However, it does not stay closed under the weight of a bed pillow during sleep, so limit this technique to sofa or accent pillows. The overlap should be at least 4–5 inches to prevent the insert from showing through.
How to Make a Pillow Without a Sewing Machine
Not everyone has access to a sewing machine, but you can still construct a functional pillow using one of these hand-sewing or no-sew methods.
Hand Sewing
Use a running stitch or backstitch around the perimeter of the pillow panels. The backstitch is stronger and more durable—it doubles back on itself after every stitch, creating a chain of overlapping threads that resists pulling apart. Use a heavy-duty hand-sewing needle and strong polyester thread. Sewing a standard pillow by hand takes 45–90 minutes but is entirely achievable and produces a pillow that is indistinguishable from a machine-sewn one once closed.
Fabric Glue
Fabric glue or fusible bonding tape can bond the edges of two fabric panels together without any stitching. This works acceptably well for lightweight decorative pillows that will not be washed frequently. For a sleeping pillow that will see regular washing and compression, fabric glue alone is not durable enough—seams will eventually separate, especially at the corners where stress concentrates.
Fleece Tie Pillow (No-Sew)
A fleece tie pillow requires no sewing at all. Cut two identical squares of polar fleece (18 × 18 inches is a standard decorative size), cut 3-inch fringe along all four edges of both pieces, hold them face-to-back, and tie the corresponding fringes together in double knots all the way around three sides. Stuff with fiberfill, tie the final side shut. Polar fleece does not fray when cut, making this an ideal first project for children or beginners. It is not suitable for loose fill materials like down or shredded memory foam, which will fall through the tied fringe.
Common Mistakes That Ruin a Homemade Pillow
Most pillow-making problems are avoidable. The following are the mistakes that come up most consistently, along with how to prevent them.
- Overstuffing with fiberfill. More fill is not always better. An overstuffed fiberfill pillow pushes the head upward and creates neck strain. Fill the shell to about 80% capacity, then evaluate. You can always add more, but removing fiberfill from a hand-stitched closed pillow requires reopening the seam.
- Skipping the seam clip on corners. Unclipped corners bunch into rounded lumps inside the pillow, creating visible bumps on the finished surface. Clip diagonally, leaving just 2–3 threads of clearance from the stitch line.
- Using fabric with too loose a weave for foam fill. Shredded memory foam particles are small—often under ½ inch in diameter—and will work through any fabric with gaps larger than the particle size. Always use a thread count of at least 200 for a memory foam pillow shell, or add an inner liner as described earlier.
- Not pre-washing fabric. Pre-washing prevents post-construction shrinkage and removes chemical finishes applied during manufacturing. This is especially important for fabrics that will be in contact with skin during sleep.
- Cutting foam too large for the shell. A solid memory foam slab cut to exactly the finished pillow dimensions will be nearly impossible to insert through the opening and will cause the shell seams to bulge and stress. Always cut the foam 1–2 inches smaller than the shell interior on each dimension.
- Inconsistent seam allowances. Varying your seam width as you sew results in a pillow with uneven edges and corners that do not align. Use a seam guide on your sewing machine or mark the ½-inch line on your presser foot with tape.
How to Care for a Homemade Pillow
Proper care dramatically extends the life of a handmade pillow, regardless of the fill type. Follow these guidelines for each fill material.
Fiberfill Pillows
Machine wash on a gentle cycle with warm water and a small amount of detergent. To prevent fiberfill from clumping, add two tennis balls or dryer balls to the dryer cycle—they agitate the fill back into an even distribution as it dries. Dry on medium heat until fully dry; a pillow that is damp in the center will develop mold or mildew within days. Expect to replace the fiberfill every 1–2 years for a pillow used nightly.
Memory Foam Pillow Care
Memory foam—whether shredded or solid—should never be machine washed or put in the dryer. Agitation tears shredded particles into dust, and solid foam slabs absorb enormous amounts of water that the material cannot expel efficiently, which leads to mildew growth inside the foam core. Instead, spot-clean the foam with a damp cloth and mild soap, rinse by hand under cool water for spot-treated areas, and air-dry completely before reassembling.
The outer cover of a memory foam pillow can and should be washed regularly—weekly if possible—to manage the accumulation of oils, dead skin cells, and moisture that every sleeper deposits through the night. This is another strong argument for building your homemade memory foam pillow with a removable outer cover rather than a permanently sewn shell.
Down and Buckwheat Pillows
Down pillows can be machine washed on gentle and dried thoroughly with dryer balls, though professional laundering is gentler on the fill clusters. Buckwheat hull pillows must be emptied of their hulls before washing the fabric shell; hull fill should be spread in the sun to dry and air out every 2–3 months.
Cost Comparison: DIY vs. Buying a Ready-Made Pillow
One of the most common reasons people explore how to make a pillow is cost. Here is a realistic cost breakdown for making a standard queen-size pillow versus purchasing a comparable commercial product.
| Pillow Type | DIY Material Cost | Time Required | Comparable Retail Price |
|---|---|---|---|
| Fiberfill Pillow | $4–$10 | 30–45 min | $8–$25 |
| Shredded Memory Foam Pillow | $20–$50 | 60–90 min | $40–$120 |
| Solid Foam Pillow | $30–$60 | 45–60 min | $50–$150 |
| Down Alternative Pillow | $8–$18 | 45–60 min | $20–$60 |
| Buckwheat Pillow | $15–$30 | 45–60 min | $50–$100 |
The savings are most significant for memory foam and buckwheat options, where the retail markup is highest. A DIY shredded memory foam pillow made from a topper you already own can cost as little as $8–$12 in fabric, which represents savings of $30–$100 compared to mid-range commercial products. Beyond cost, the ability to customize fill volume is something most commercial pillows—even premium ones—do not offer at purchase.
Frequently Asked Questions
What is the best filling for a homemade pillow?
It depends on what you prioritize. Polyester fiberfill is the easiest to work with and the cheapest. Shredded memory foam offers better support and pressure relief, making it the closest DIY equivalent to a quality commercial memory foam pillow. Buckwheat hulls last the longest—often 10+ years with proper care—and are fully adjustable. For most first-time pillow makers, fiberfill is the best starting point.
How much fabric do I need to make a pillow?
For a standard 20 × 26 inch pillow, you need two panels of fabric each measuring at least 21 × 27 inches (including seam allowance). If you are buying fabric from a bolt, most fabric is 44–60 inches wide, so half a yard of fabric is typically enough for one standard pillow. Buy a full yard if you want to leave room for error or cutting corrections.
Can I make a memory foam pillow without sewing?
For a solid foam slab, you do not necessarily need sewing. You can purchase a pre-made pillowcase with a zipper closure and simply insert the cut foam slab. This works especially well if you want a memory foam pillow quickly and do not have sewing supplies. For shredded memory foam, a sewn or zippered shell is strongly recommended because the loose fill will escape through any imprecise closure over time.
How do I make a pillow firmer or softer after it is finished?
If you built the pillow with a zippered closure, open the zipper and add or remove fill to adjust firmness. For a hand-stitched closure, use a seam ripper to open 3–4 inches of the closing stitch, adjust the fill, and restitch. With shredded memory foam, removing fill makes the pillow softer and flatter; adding fill makes it firmer and higher. The adjustment process usually takes less than 10 minutes once you have done it once.
How long does a homemade memory foam pillow last?
With proper care, a DIY memory foam pillow made with quality foam (density 3 lb/ft³ or higher) should last 3–5 years before the foam loses its resilience. Shredded foam compresses slightly faster than a solid slab under the same conditions. Regularly washing the outer cover and keeping the foam away from direct sunlight and moisture extends its usable life considerably.